ESP 8266
Table of Contents
Premessa
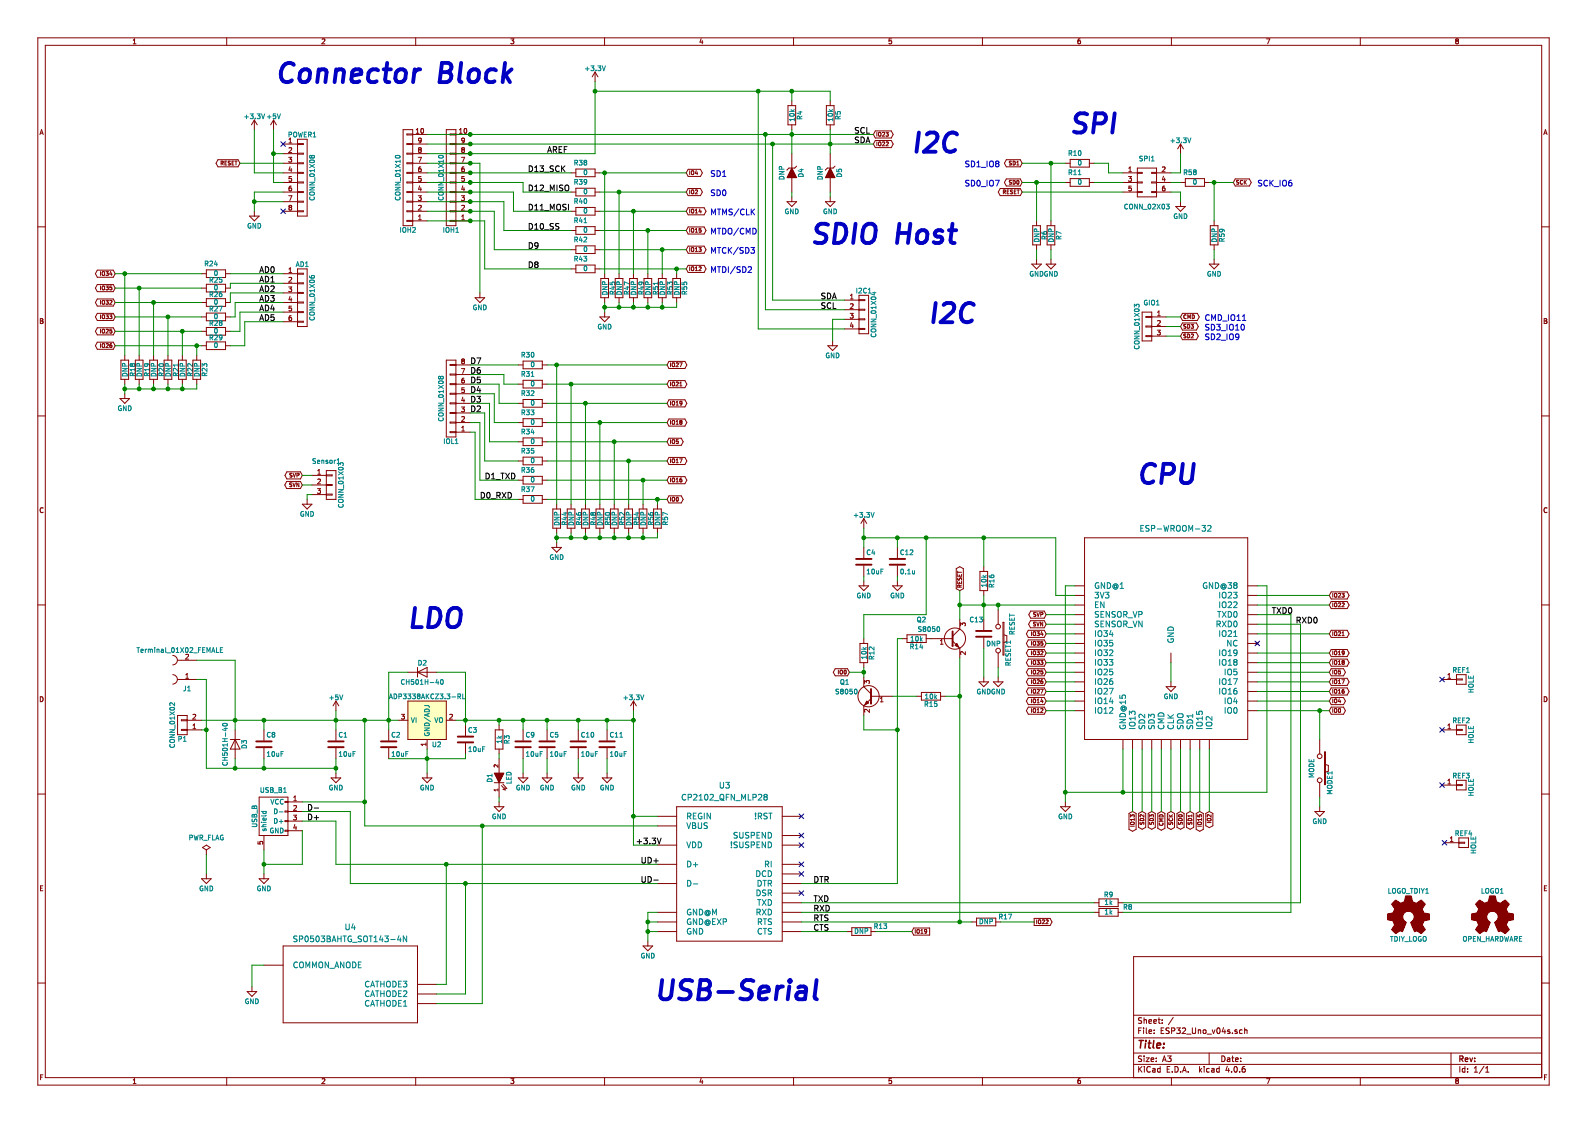
- Board : AZ-Delivery D1 R32 con chip ESP32 WROOM-32 con schema elettrico
- Schema
- file json delle specifiche delle schede:
- Board specifica : ESP32 Arduino -> ESP32 Dev Module;
- per compilare con arduino-cli : arduino-cli compile –fqbn esp32:esp32:esp32 … , arduino-cli upload -p /dev/ttyUSB0 –fqbn esp32:esp32:esp32 …
- specifiche schede
- Riscontrato problema con la porta seriale:
- verificare che sia installato il modulo python pyserial :sudo pip3 list | grep serial
- Se il modulo pyserial non è installato scaricare quello per la versione corrente di python;
- Installare il pacchetto python-is-python3 che serve a creare symlink in /usr/bin/python in quanto alcuni software hanno come path di ricerca la predetta cartella come i tools delle board di Arduino : sudo apt install python-is-python3
- Note of Board
- Forum for ESP 32
- ESP8266 Arduino Core’s documentation contiene una descrizione delle librerire;
- Arduino Cli
- Expressif
- Introduzione Platformio ambiente di sviluppo
- Esempi Platformio github PlatformIO
- new project : create path ; cd path; pio init –ide emacs –board esp32dev
- Build project : platformio run
- Upload code : platformio run –target upload
- Build specific environment :platformio run -e uno
- Upload firmware for the specific environment : platformio run -e uno –target upload
- Clean build files : platformio run –target clean
- device monitor: pio device monitor
Utility
Init
Qui una breve introduzione su schede di tipo ESP32 e sul loro sistema operativo e di come e' organizza la memoria del deispositivo
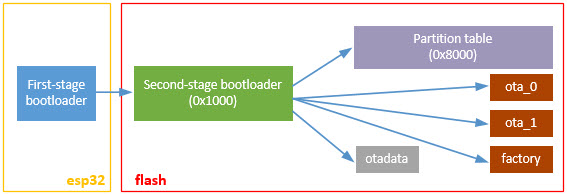
Figure 1: Organizzazione della memoria
dump partition table
# Modificato
# Name,     Type, SubType, Offset,   Size, Flags
# nvs,      data, nvs,     0x9000,   0x5000,
# otadata,  data, ota,     0xe000,   0x2000,
# app0,     app,  ota_0,   0x10000,  0x1E0000,    # Aumentato da 0x140000 a 0x1E0000
# app1,     app,  ota_1,   0x1F0000, 0x1E0000,    # Aumentato da 0x140000 a 0x1E0000
# spiffs,   data, spiffs,  0x3D0000, 0x230000,

#
# Schema grafico della flash
#
#     5000      2000     1E0000    1E0000
#     __^__   ___^___   ___^___   ___^___   ___^___
#    /     \ /       \ /       \ /       \ /       \
#   |-------|---------|---------|---------|---------|
# 9000    E000      10000     1F0000    3D0000
#    \__ __/\____ ___/ \___ ___/ \___ ___/ \___ ___/
#       v        v         v         v         v
#      nvs     tadata     app0      app1     spiffs
#
# In questo schema grafico e' inserita la partizione ota_1 che viene utilizzata come backup della
# partizione ota_0
#
# La dimensione dello spazio e' la differenza degli offset di due partizioni adiacenti, ad esempio lo spazio di ota_0 e' la
# differenza tra gli offset di ota_1-ota
#

# Modificato
# Name,   Type, SubType, Offset,   Size,      Flags
nvs,      data, nvs,     0x9000,   0x5000,
otadata,  data, ota,     0xe000,   0x2000,
app0,     app,  ota_0,   0x10000,  0x3C0000,
spiffs,   data, spiffs,  0x3D0000, 0x5000,


#
# Schema grafico della flash
#
#      5000      2000     3C0000      5000 minore della dimensione max che e' 0x230000
#     ___^___   ___^___   ___^___   ___^___
#    /       \ /       \ /       \ /       \
#   |---------|---------|---------|---------|
# 9000      E000      10000     3D0000
#    \___ ___/ \___ ___/ \___ ___/ \___ ___/
#        V         V         V         V
#       nvs     otadata     app0      spiffs
#
# In questo schema invece la partizione ota_1 e' stata eleminitata per aumetare lo spazio per il codice
# compilato.
Per caricare una configurazione e' necessario salvarla in un file con estensione cvs e utilizzare la direttiva boardbuild.partitions del file di configurazione di platformio.ini, ad esempio se la configurazione e memorizzata nel file defaultFS.csv un esempio di platformio.ini
; PlatformIO Project Configuration File
;
;   Build options: build flags, source filter
;   Upload options: custom upload port, speed and extra flags
;   Library options: dependencies, extra library storages
;   Advanced options: extra scripting
;
; Please visit documentation for the other options and examples
; https://docs.platformio.org/page/projectconf.html

[env:esp32dev]

; esempio di inclusione del file di configurazione della flash
board_build.partitions = default_FS.csv


platform = espressif32
board = esp32dev
framework = arduino
monitor_speed = 9600
upload_port = /dev/ttyUSB0
monitor_port = /dev/ttyUSB0
debug_tool = esp-prog
debug_init_break = tbreak setup
lib_deps =
	xreef/EByte LoRa E220 library@^1.0.8
	plerup/EspSoftwareSerial@^8.0.3
	adafruit/Adafruit Unified Sensor@^1.1.13
	beegee-tokyo/DHT sensor library for ESPx@^1.19
	adafruit/DHT sensor library@^1.4.4
	me-no-dev/ESP Async WebServer@^1.2.3
	ottowinter/ESPAsyncWebServer-esphome@^3.1.0
	mobizt/Firebase Arduino Client Library for ESP8266 and ESP32@^4.4.8
esptool --port "/dev/ttyUSB0" dump_mem 0x8000 0xc00 ptable.img
python /home/n3og3o/.platformio/packages/framework-arduinoespressif32/tools/gen_esp32part.py ptable.img mem.csv
genesp32part.py
$ ~/.platformio/packages/tool-esptoolpy/esptool.py

esptool.py v3.3
usage: esptool [-h] [--chip {auto,esp8266,esp32,esp32s2,esp32s3beta2,esp32s3,esp32c3,esp32c6beta,esp32h2beta1,esp32h2beta2,esp32c2}] [--port PORT] [--baud BAUD]
[--before {default_reset,usb_reset,no_reset,no_reset_no_sync}] [--after {hard_reset,soft_reset,no_reset,no_reset_stub}] [--no-stub] [--trace]
[--override-vddsdio [{1.8V,1.9V,OFF}]] [--connect-attempts CONNECT_ATTEMPTS]
{load_ram,dump_mem,read_mem,write_mem,write_flash,run,image_info,make_image,elf2image,read_mac,chip_id,flash_id,read_flash_status,write_flash_status,read_flash,verify_flash,erase_flash,erase_region,merge_bin,get_security_info,version}
...

esptool.py v3.3 - Espressif chips ROM Bootloader Utility

positional arguments:
{load_ram,dump_mem,read_mem,write_mem,write_flash,run,image_info,make_image,elf2image,read_mac,chip_id,flash_id,read_flash_status,write_flash_status,read_flash,verify_flash,erase_flash,erase_region,merge_bin,get_security_info,version}
Run esptool {command} -h for additional help
load_ram            Download an image to RAM and execute
dump_mem            Dump arbitrary memory to disk
read_mem            Read arbitrary memory location
write_mem           Read-modify-write to arbitrary memory location
write_flash         Write a binary blob to flash
run                 Run application code in flash
image_info          Dump headers from an application image
make_image          Create an application image from binary files
elf2image           Create an application image from ELF file
read_mac            Read MAC address from OTP ROM
chip_id             Read Chip ID from OTP ROM
flash_id            Read SPI flash manufacturer and device ID
read_flash_status   Read SPI flash status register
write_flash_status  Write SPI flash status register
read_flash          Read SPI flash content
verify_flash        Verify a binary blob against flash
erase_flash         Perform Chip Erase on SPI flash
erase_region        Erase a region of the flash
merge_bin           Merge multiple raw binary files into a single file for later flashing
get_security_info   Get some security-related data
version             Print esptool version

options:
-h, --help            show this help message and exit
--chip {auto,esp8266,esp32,esp32s2,esp32s3beta2,esp32s3,esp32c3,esp32c6beta,esp32h2beta1,esp32h2beta2,esp32c2}, -c {auto,esp8266,esp32,esp32s2,esp32s3beta2,esp32s3,esp32c3,esp32c6beta,esp32h2beta1,esp32h2beta2,esp32c2}
Target chip type
--port PORT, -p PORT  Serial port device
--baud BAUD, -b BAUD  Serial port baud rate used when flashing/reading
--before {default_reset,usb_reset,no_reset,no_reset_no_sync}
What to do before connecting to the chip
--after {hard_reset,soft_reset,no_reset,no_reset_stub}, -a {hard_reset,soft_reset,no_reset,no_reset_stub}
What to do after esptool.py is finished
--no-stub             Disable launching the flasher stub, only talk to ROM bootloader. Some features will not be available.
--trace, -t           Enable trace-level output of esptool.py interactions.
--override-vddsdio [{1.8V,1.9V,OFF}]
Override ESP32 VDDSDIO internal voltage regulator (use with care)
--connect-attempts CONNECT_ATTEMPTS
Number of attempts to connect, negative or 0 for infinite. Default: 7.
Read partition table
python /home/n3og3o/.platformio/packages/tool-esptoolpy/esptool.py read_flash 0x8000 0xc00 ptable.img
python gen_esp32part.py ptable.bin ptable.csv
Platformio
load file on SPIFFS
make folder "data" in a root directory
adding file in "data" folder

type pio run -t uploadfs
cancellare file : pio run -t erase